Introduction
Okay, so you want to put a quest into your Neverwinter Nights 2 module, right? And it all sounds so simple and straightforward, right? Well, the good news is that it generally is, especially once you've made a couple of your own. The bad news is that the learning curve can be pretty steep, especially for your first try. This little tutorial is meant to help you along on your first multi-part quest.
First, you'll need the MOD file that goes with this tutorial...that is, unless you want to wing it and pretend that you know what much of this article is referring to. If that's the case, then feel free. But if you want to see what I'm going to be talking about in action, download the module here.
Step One: The Journal
We'll need to first plan out what's going to happen in our quest. For the first example, we have a simple "fetch and retrieve" quest. You meet an NPC, talk to him, he asks you to bring him something, which you go find and bring back. So what are the steps to this quest?
- Talk to the NPC, get the quest.
- Get the item and return to the NPC with it.
So you first set this up in the Journal Editor, under the View menu in the NWN2 Toolset (see screenshot). Each quest is a "Category" and under each "Category" are the sub-items. In the example, there are two quests that we've defined - "Get Noob's Shield" and "Get Rid of the Kobold." Since we're talking about the "fetch" type of quest, we'll start with the first one, taking care to note the tag associated with that quest, mod_q_noobshield.
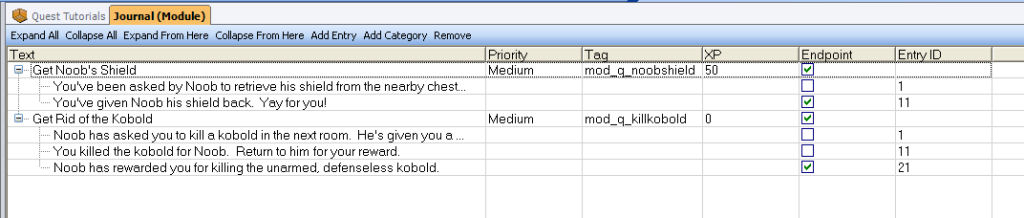
As you can see, each step of the quest has its own item listed here. Each step also has its own EntryID, which will be important later if you decide to manually modify journals with scripts (along with the script tag itself, something covered in the second tutorial). Now that we've got a simple quest laid out, how do we get it moving?
Conversations
Since our quest starts by talking to an NPC, we need to set up a conversation, which oddly enough is powered by the Conversation Editor. To get there, first open the Conversation Browser on the left side of the editor (denoted by the  icon). Right-clicking and choosing "Add" creates a new conversation, or you can edit one of the existing ones (see below).
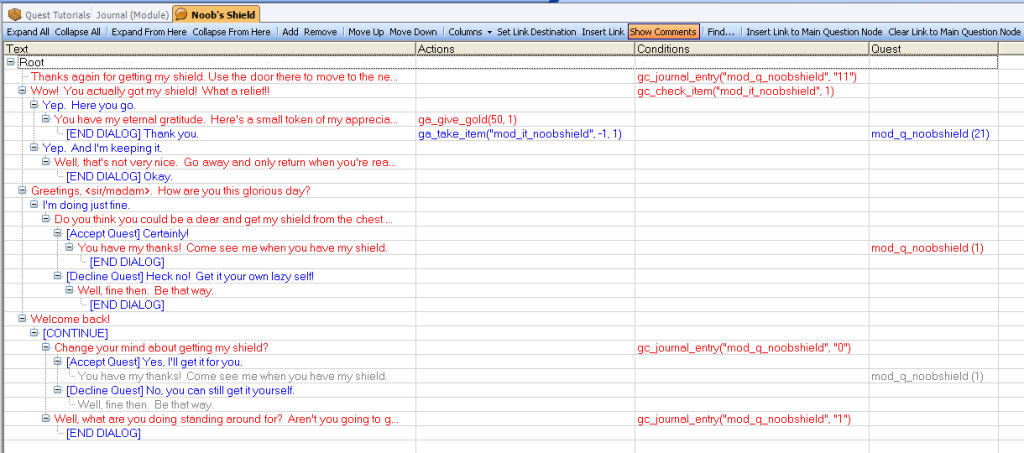
Okay, so maybe that's a little imposing at first, but once you get the hang of it, it's really not so bad. First thing to remember is that your conversation has to be built in reverse order from how you'll be calling it. This is necessary because of the way in which NWN checks conditions on any given node. It fires off the very first node that meets the listed criteria, ignoring all others. That said, we have four conversation states here that we're juggling:
- Initially greeting the PC. Greetings...
- Already met the PC. Welcome Back...
- PC has the quest item. Wow! You actually got my shield...
- PC has completed the quest previously. Thanks again for getting my shield...
Now, the observant reader will notice that these aren't listed in truly backward order in the Conversation. In fact, we go 4, 3, 1, 2. This is because of some fun with node settings that makes conversation node #1 fire only once per PC. But that's getting a little bit ahead of ourselves. Each conversation branch (and node) shown here has four characteristics (there are more, but these are the pertinent ones for this tutorial):
- Text: The actual text that is spoken by the character; blue is PC text, red is NPC text.
- Actions: Any scripted actions that take place during the branch (eg: give gold, take item, etc.); blue & red designate the default object for the action (PC or NPC).
- Conditions: NWN will check the results of any script here, and fire off the first node/branch that returns TRUE (for NPCs) or show the conversation option if the condition is TRUE (for PCs)
- Quest: This is a special function of the Node that causes a change in a Quest state.
Note: Actions and Conditions have their own tabs at the bottom of the Conversation Editor, but the Quest column is related to an item on the Node tab (more later).
Changing Quest Status in Conversations
Here's where the rubber hits the road. I'm going to go ahead and presume that you can create your conversation to flow however you want - fairly straightforward, the NPC speaks what's in red - consecutive red text are spoken after one another, and the PC can make choices based on what show's up in blue immediately under that. The basic help file in the Toolset covers this pretty well. Once you have your conversation set up, and you know at which points you want something to change the status of a quest, THAT'S when the fun begins.
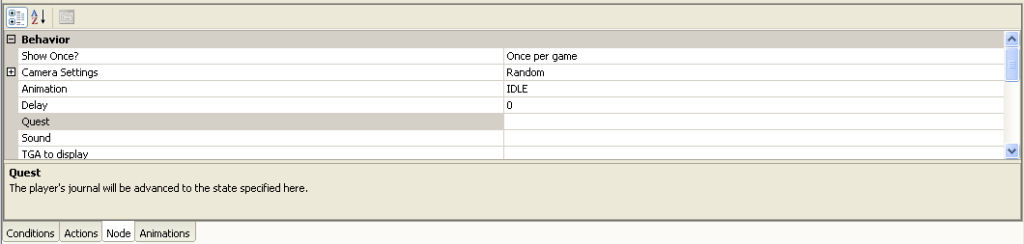
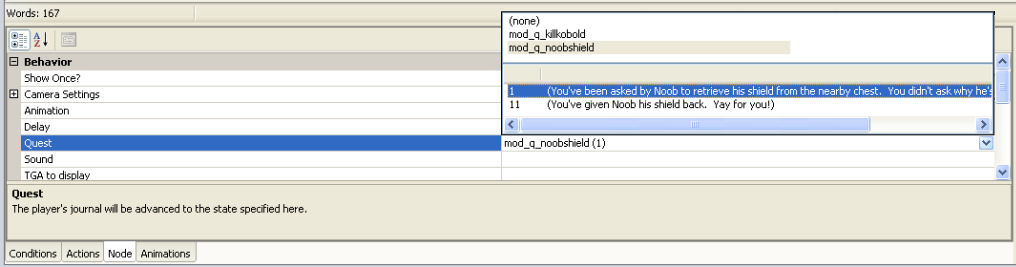
Identify the node that you want something to happen on (for example, You have my thanks! Come see me when you have my shield. from the screenshot above). Select it in the editor, then click the Node tab. You'll want to scroll up until you see the Quest item under the Behavior container. Clicking on this gives you a list of all the current Quests in the Journal, and selecting one of those brings up the possible states. Below, we've selected the mod_q_noobshield quest, and told the system to set that quest to state 1, beginning the quest, and placing it into the PC's journal.
Setting Conversation Nodes Based on Quest Status
Once we've set the Quest to be triggered, we need to make sure that all the NPC branches are set to fire only under the proper conditions. For this, not surprisingly, we need to use the Conditions tab. Select the node that you want to make conditional (eg: Thanks again for getting my shield...), then click the Conditions tab at the bottom of the editor. From the drop-down of possible condition scripts, we want to choose gc_journal_entry, then click Refresh. This script checks the state of any Journal entry, and returns TRUE or FALSE, depending on the results of the check. A TRUE result causes that node to fire, and all other nodes are ignored. A FALSE result causes the system to skip that node completely and move to the next, until it finds one a node that has no Conditions or one where the Conditions are met. We just need to set the sQuestTag (String) value to mod_q_noobshield, our Quest's tag, and the sCheck value to 11, the value of the quest upon completion (after you've returned the shield to the NPC.
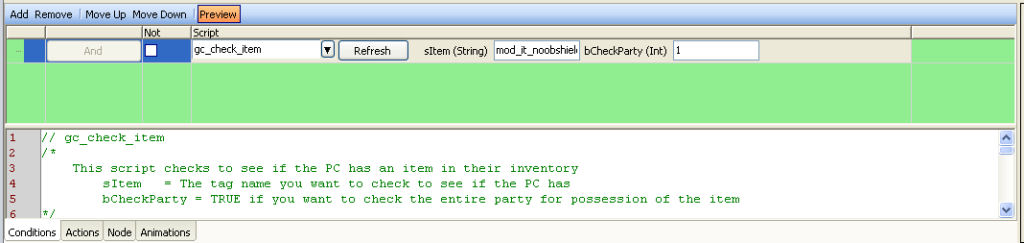
That takes care of the final state for the NPC, but what about delivering the shield? For this, we need to check the PC's inventory to see if they have the requested item, using the gc_check_item script. For this one, the sItem string is the tag of the item we're checking for (in this case, mod_it_noobshield), and bCheckParty to 1 to check all members of the PC's party for the item.
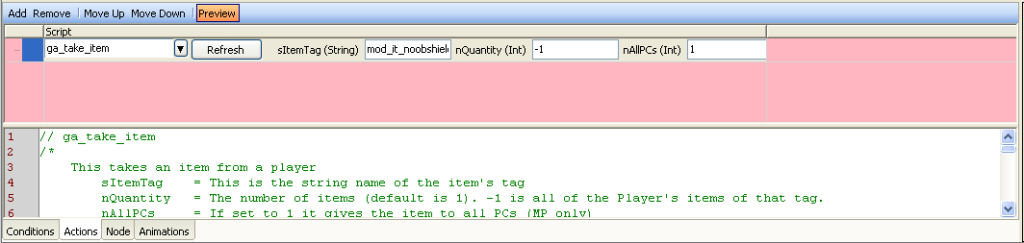
Because that causes the node to fire if the PC has the NPC's requested item, further along in that same node, we update the journal (after the PC gives the item up, of course!). Here, we use the Quest node property again, setting the Quest status to 11 when the PC gives up the item (we also have some Actions that give the PC's party some gold and (importantly) take away the item from the PC (or party member). This is done by assigning a ga_take_item() script on the Actions tab for the given conversation node, again using the tag for the shield, mod_it_noobshield, a Quantity of -1 to remove all instances, and nAllPCs set to 1 to take the item from anyone in the party.
Now we've set two of the four conversation nodes. Now, why does step #1 come before step #2? Simple - neither of these nodes have a Condition assigned to them, so if we put them in the "expected" order, Welcome back... would always fire off before Greetings..., which we definitely do NOT want. So, instead we put step #1 first, and set the Show Once? Node behavior to Once per game. This means that the Greetings... node will fire only the first time a PC interacts with the NPC, and every other time, the Welcome back... node will take over. You might consider this a form of condition, but it's key that you remember that actual Conditional nodes have to go in reverse order, then Node behavior controlled nodes, and last comes the "default" node.